Updating Your Carrier API Credentials in Kuebix TMS
In support of ongoing maintenance and carrier API updates, users of Kuebix TMS need to update the following credential information in Kuebix for the following carriers: UPS Ground with Freight, and UPS Parcel by Thursday, November 6, 2025.
This ensures the rates provided are up to date based on your carrier agreements. Below are detailed instructions on how to update credentials for specific carriers.
An alert will also appear on the Kuebix main page alerting you to update the credentials. Twenty-four hours after updating the carrier credentials, if done correctly, you will not see the alert on the Kuebix main page.
Step 1: Have your Saia Username, Password, and Account Number
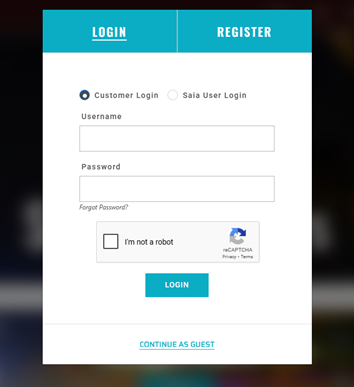
Before you start this process, you will need to make sure you have your Saia.com username, password, and account number. If you are unsure of this information, visit saia.com and select login at the top right corner.
Once logged in, click QUOTE in the top menu and select LTL option. This will show your shipping locations and associated account numbers.
Step 2: Generate API Keys through Saia Developer Portal
To connect Saia to your Kuebix account, you must obtain API keys specific to your account. Go to the Saia Developer Portal: https://saiaprodapi.developer.azure-api.net and click the “Sign Up” button. Complete the form and click the “Sign up” button at the bottom. Safely store your login credentials.
Step 3: Confirm your new Saia API Account via Email
Check your inbox for an email with the subject line of “Please confirm your new SAIA API account.” Click the link in the email to return to the Saia Developer Portal. Log in with the credentials created in Step 1. After logging in, click on Products in the top right corner.
Step 4: Login to the Saia Developer Portal and Navigate to the Products Page
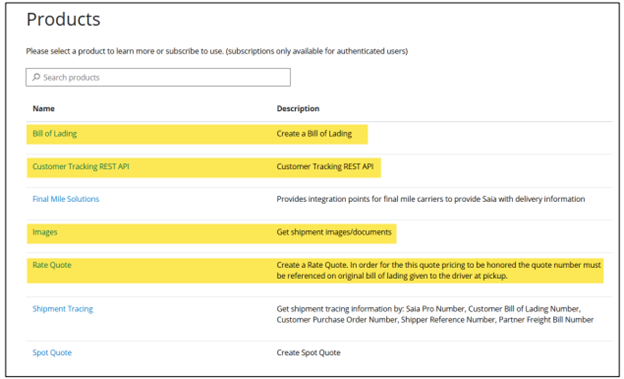
Step 5: Create subscriptions for Bill of Lading, Customer Tracking REST API, Images & Rate Quote Products
On the Products page, right-click each highlighted product in the image below and select the “Open link in a new tab” option. It may be easier to do these one at a time.
The following Products need to be updated:
Bill of Lading
Customer Tracking REST API
Images
Rate Quote
Step 6: Create the Four Product Subscriptions
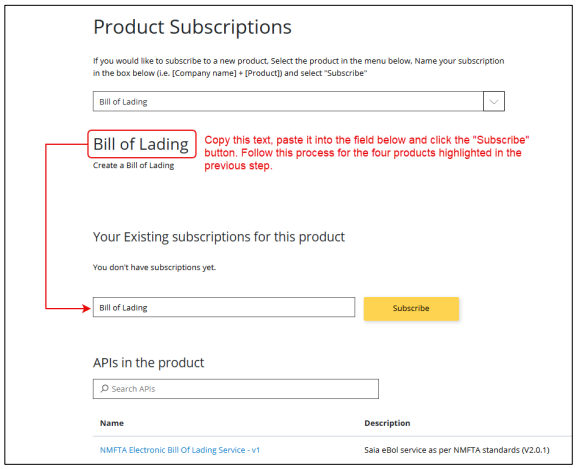
For each of the four products opened in a new browser tab, create a product subscription name and click the “Subscribe” button. For the naming of the product, simply copy the name provided at the top of the page (refer to the example below).
Step 7: Navigate to your Saia Profile tab
After subscribing to all four highlighted products, click the “Profile” menu option in the upper right corner.
Step 8: Copy Your Primary Keys into a Document
You should see four subscriptions listed, one for each product. Each product has a Primary and Secondary Key assigned. You only need the Primary Keys. Click the “Show” link next to each product to reveal the assigned Key. Copy the Primary Keys into a document or somewhere easily accessible.
Note: If you have multiple Saia agreements this will need to be done for each agreement.
Step 9: Login to Kuebix
Once you have your four Saia Primary Keys available. Login to Kuebix.
Step 10: Navigate to the “Connected Carriers” within Kuebix
Click Manage Carriers and navigate to “Connected Carriers” drop down.
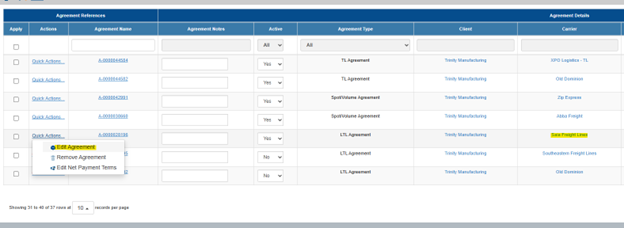
Step 11: Locate your Saia Agreement & Select “Quick Actions”
Navigate through your carrier agreements until you find the Saia Freight Lines agreement. If you click on “Quick Actions” you will see an option to “Edit Agreement.”
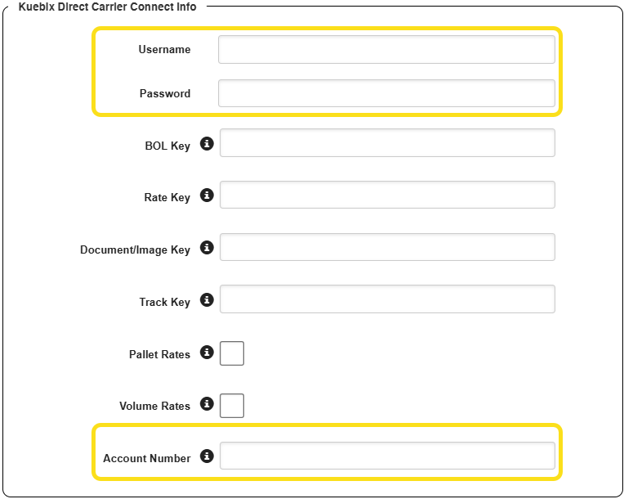
Step 12: Update your credentials
Update your credentials with username, password, account number.
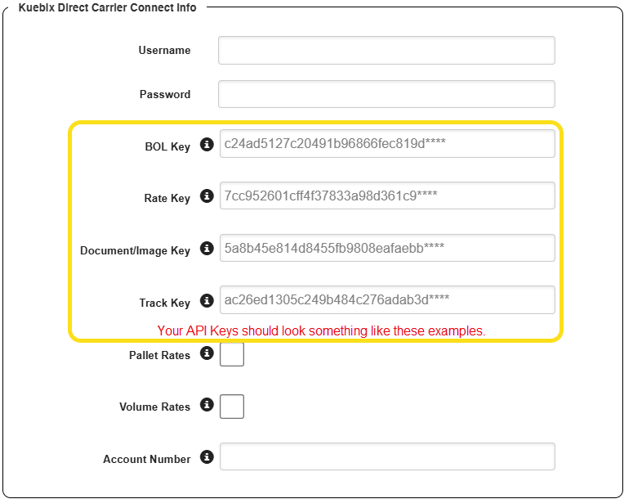
Step 13: Paste in the API keys in the “Kuebix Direct Carrier Connection Info”
Bill of Lading Key from Saia will go into the “BOL Key” field
Customer Tracking REST API from Saia will go into the “Track Key” field
Images from Saia will go into the “Document/Image Key” field
Rate Quote from Saia will go into the “Rate Key” field
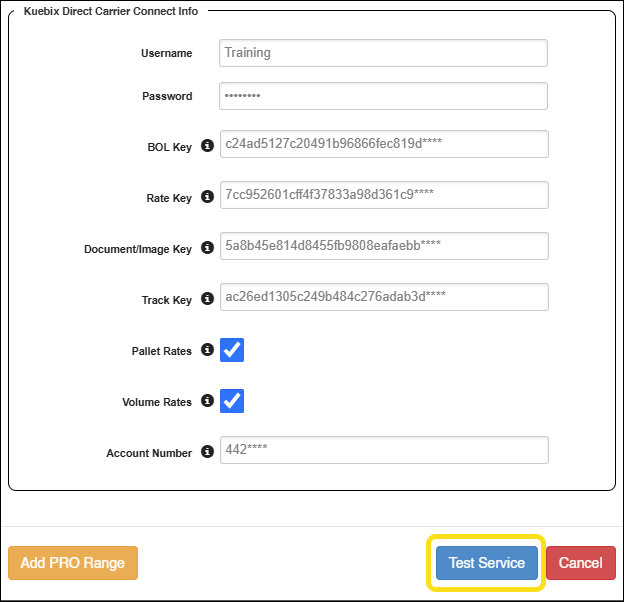
If applicable, select pallet rate pricing or volume rate pricing.
If you have pallet rate pricing with Saia, check the box. If you have volume rate requests with Saia, check the box.
Step 14: Click Test Service Blue Button
Once all API keys are complete, click the blue “Test Service” button.
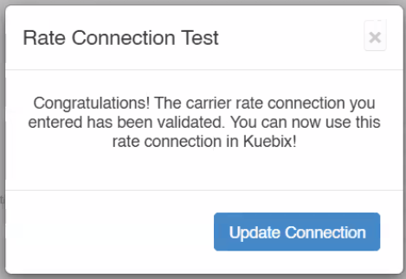
Step 15: Rate Connect Test
If the APIs were correctly updated, a pop up will appear noting that your Rate Connection Test was confirmed. On this pop-up select the “Update Connection” blue button, which will open a new window.
Step 16: Carrier Rate Connection Window
Once you see the “Carrier Rate Connection” pop up window you can X out of the window or press cancel, and the connection will be updated.
If you have multiple agreements with a single carrier, make sure each agreement is updated.
UPS Ground with Freight or UPS Parcel Instructions
Step 1: Have your UPS Ground with Freight (GFP) or UPS Parcel Username, Password, and Account Number
Before you start this process, you will need to make sure you have your UPS GFP or UPS Parcel username, password and account number for each selected location. Visit UPS.com.
Note: If you have both a UPS GFP and UPS Parcel Agreement that uses the same UPS.com profile, you can use the Client ID and Client Secret previously acquired.
Step 2: Navigate to the UPS Developer Portal
Visit: https://developer.ups.com and click the “Login” button in the upper right. Use your UPS.com credentials and follow the prompts to login.
Step 3: Once logged in, click the “Create Application” button.
From the page that loads click the “Add Apps >” link. Under the “Which of these scenarios best describes you?” section select the following:
I need API credentials because: (Select:) I want to integrate UPS technology into my business
Choose an account to associate with these credentials: If your UPS shipping account is listed click to select it. If it is not available, follow the prompts to have it added.
When your account is selected, check the “I agree and have consent…” box to confirm you have your company’s consent to register for the UPS APIs.
Step 4: Enter Contact and Address Information.
On the next page you must fill out your contact and address information. Please note, you do not have to subscribe for UPS API status and update email alerts (unless you want to).
Once all required fields are completed click the “Next >” button.
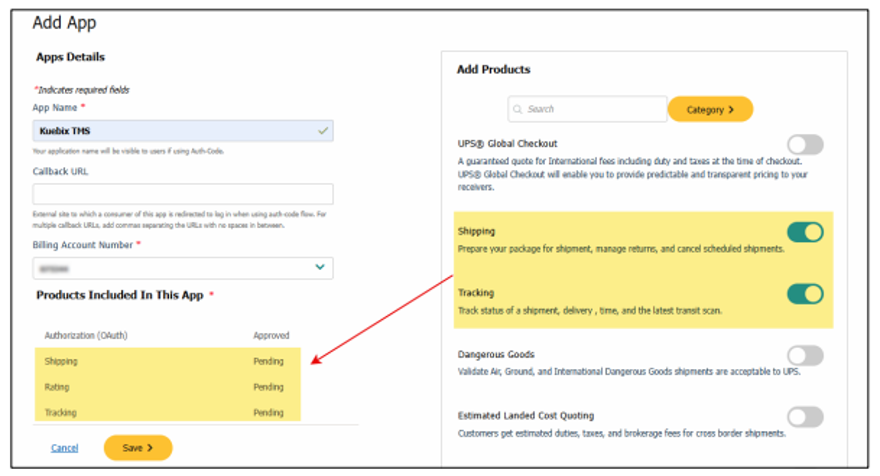
Step 5: Select which API products are needed.
You are now on the “Add App” page. In the “App Name” field, enter Kuebix TMS.
In the “Add Products” section on the right, add the following products:
Rating
Shipping
Tracking
Address Validation
Search for each product and click the slide bar to enable it for your App. As you enable each product, it will appear in the bottom left (see example image below). Once you have added all required products, click the yellow “Save” button to complete this step.
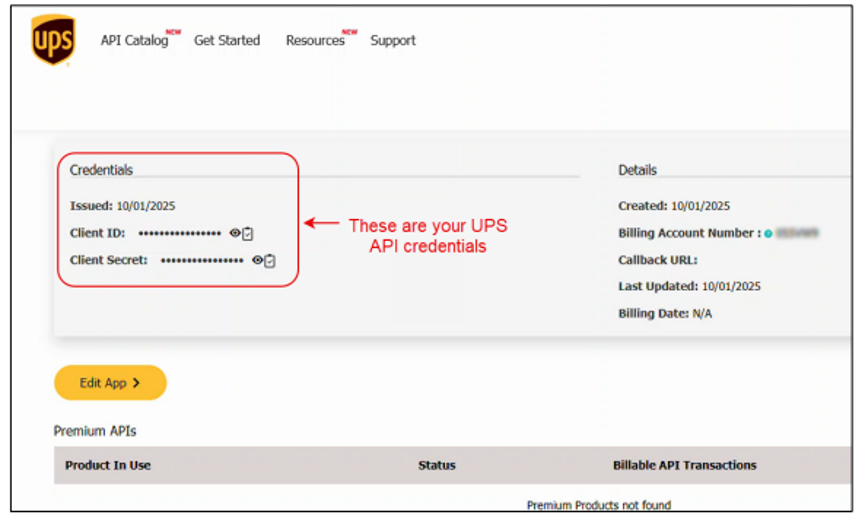
Step 6: Confirm your API Credentials
You are now on a page with the newly created API credentials. They are masked, but you can click the eye icon to reveal them or click the clipboard icon with the check mark to copy the value.
Step 7: Copy your API credentials
Once you have reviewed the credentials, copy and paste them into a document for easy access or leave the UPS Developer Portal tab open in your browser.
If you have any trouble getting UPS Client ID and Client Secret, please contact UPS customer support for assistance.
Step 9: Login to Kuebix
Once you have your four UPS API Products available. Login to Kuebix.
Step 10: Navigate to the “Connected Carriers” within Kuebix
Click Manage Carriers and navigate to “Connected Carriers” drop down.
Step 11: Locate your UPS Ground Freight or UPS Parcel Agreement & Select “Quick Actions”
Navigate through your carrier agreements until you find the UPS GFP or UPS Parcel agreement. If you click on “Quick Actions” you will see an option to “Edit Agreement.”
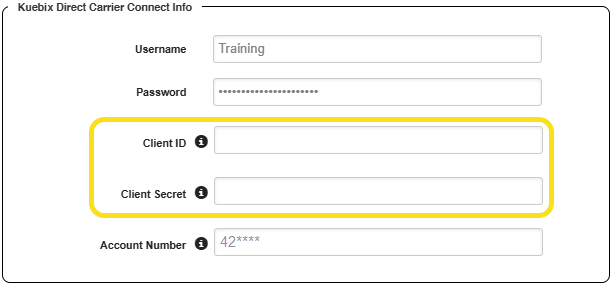
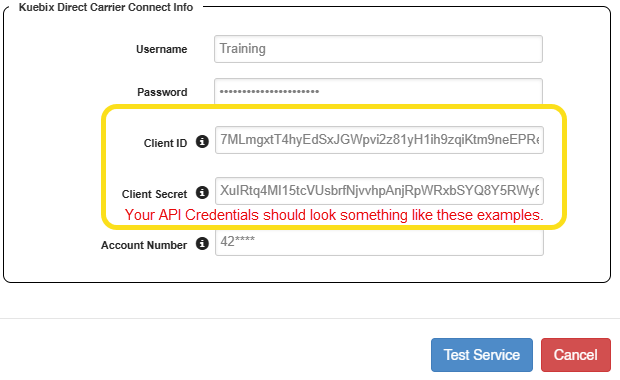
Step 12: Enter Client ID and Client Secret
Once you have clicked “Edit Agreement” for UPS Ground Freight, then enter your Client ID and Client Secret. Your Client ID and Client Secret should look similar to the combination of letters and numbers below.
Step 13: Click “Test Service”
Once your information has been entered click the blue “Test Service” button. If the updated APIs went through a popup will appear saying “Rate Connection Test” and confirm that your test is complete.
Step 14: Carrier Rate Connection Window
Once you see the “Carrier Rate Connection” pop up window you can X out of the window or press cancel, and the connection is now updated.
If the connection has been updated correctly, you will no longer see the pop-up on the Kuebix main screen the following day after it is updated.
If you have questions about this process, please contact the Kuebix Customer Care team.
N&M Transfer Credential Update Instructions
All Kuebix users with an active N&M Transfer agreement need to update their credentials in order to keep using this carrier.
Step 1: Have your N&M Transfer Account Number and Email Address
To initiate this process, you will need the Account Number and Email Address associated with your N&M Transfer account. If you do not know the email address used, please email I.T.HELP@nmtransfer.com for assistance.If you want to add an email address to your account, please log in to the old website https://legacy.nmtransfer.com/login. There will be a prompt at the top of the page to add an email address after you log in.
Step 2: Get your new N&M Transfer API key
Register for your new API Key for N&M Transfer here: https://www.nmtransfer.com/customer-loginYou will need to enter this information to obtain the API key. If you get an error message that your email is “not listed” email I.T.HELP@nmtransfer.com for assistance.Additional Tip: To add an email address to your account, log in to the old website. You’ll see a prompt at the top of the page to add an email address after logging in.
Step 3: Copy your API credential
Have your API credential for N&M Transfer handy so you can copy and paste it into the Connected Carriers portion of Kuebix.
Step 4: Login to Kuebix
Once you have your API Key for N&M Transfer. Login to Kuebix.
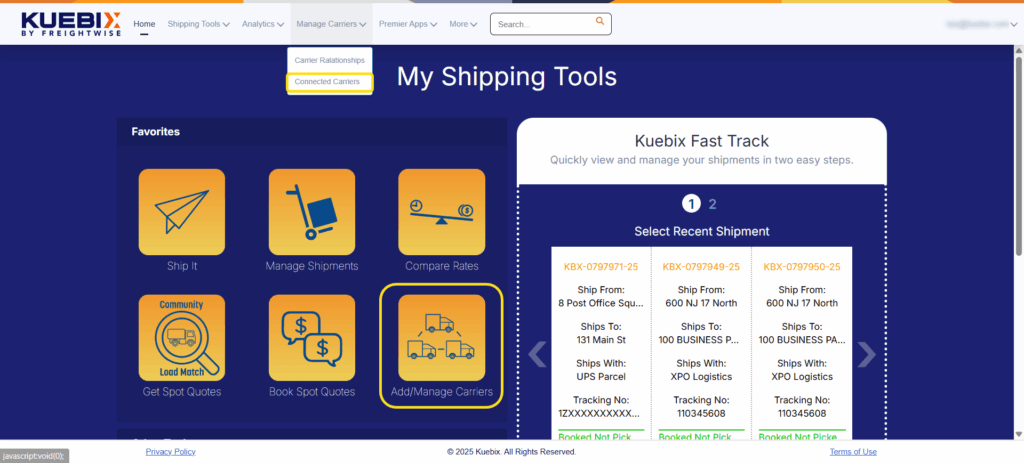
Step 5: Navigate to the “Connected Carriers” within Kuebix
Click Manage Carriers and navigate to “Connected Carriers” drop down.
Step 6: Locate your N&M Transfer Agreement & Select “Quick Actions”
Navigate through your carrier agreements until you find the N&M Transfer agreement. If you click on “Quick Actions”, you will see an option to “Edit Agreement.”
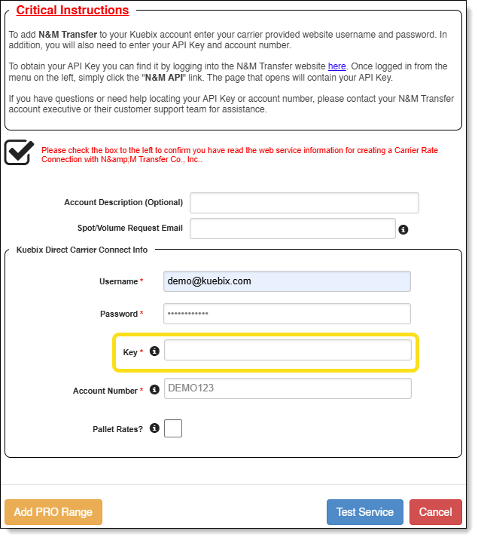
Step 7: Enter the updated Key for N&M Transfer.
Enter the API Key generated in the “Key” field along with the account number for N&M Transfer.
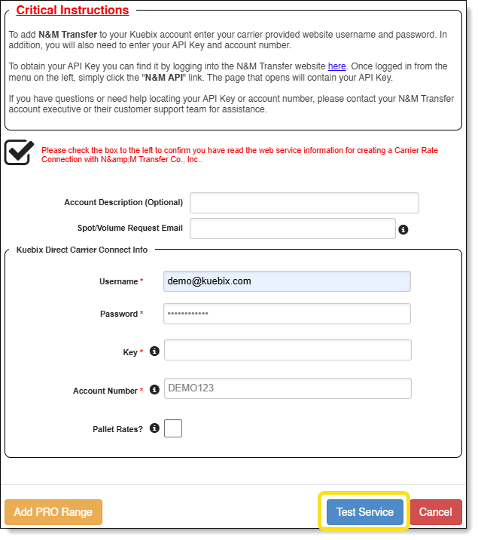
Step 8: Click “Test Service”
Once all information is entered select the blue “Test Service” button to ensure all information is connected.
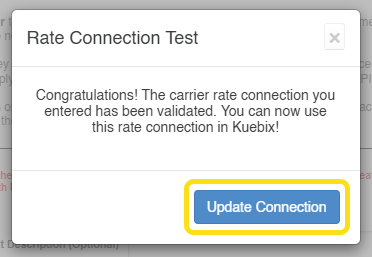
Step 9: Rate Connection Test Confirmation
A pop up will appear notating that the Rate Connection Test was successful. Close out by selecting “Update Connection” and then you have successfully updated N&M Transfer APIs.
How to Remove a Carrier Agreement within Kuebix
Step 1: Login to Kuebix. Step 2: From the main screen access Connected Carriers.
You can click “Manage Carriers”> “Connected Carriers” from the top navigation, or click the “Add/Manage Carriers” tile.
Step 3: Sort/Filter Carrier Agreements
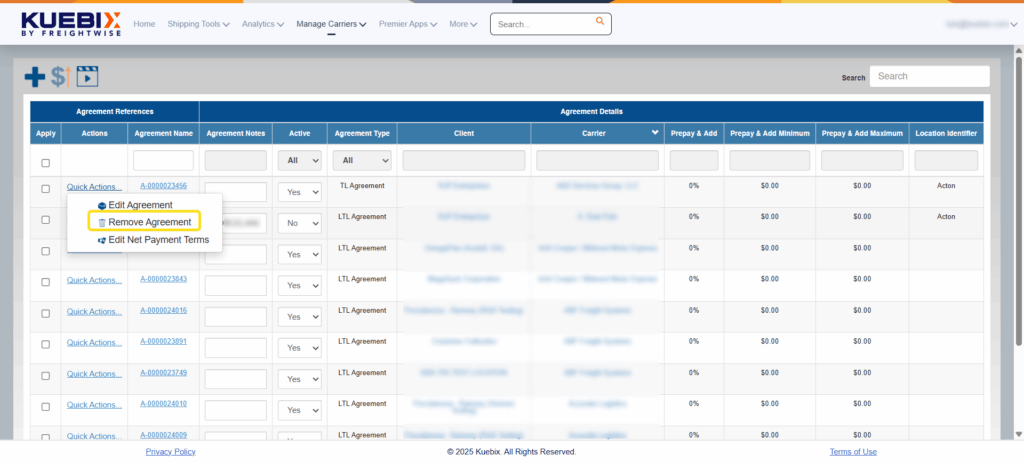
Navigate to the carrier agreement and select “Quick Actions.” Then select “Remove Agreement.”
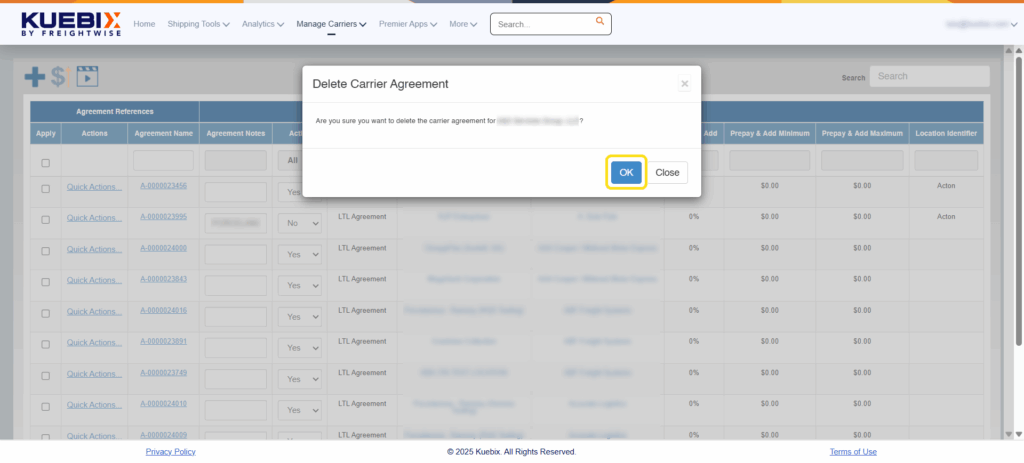
Step 4: Confirm Removal of the Carrier Agreement
A pop-up will appear confirming you want to delete the carrier agreement. Select “OK” and the carrier agreement will be removed from Kuebix.
We use cookies to ensure that we give you the best experience on our website. If you continue to use this site we will assume that you are happy with it.
 Kuebix is now a part of FreightWise